Shopping Ads on Google: What Every New Seller Ought to Know

Since it launched as a paid channel in 2012, Shopping ads on Google have delighted both shoppers and advertisers alike. Shopping ads are some of the most clicked ads Google has to offer. For retailers, Shopping ads account for over 60% of their paid clicks. For our clients, Shopping Ads consistently delivers some of the highest return on ad spend of any paid channel.
Shopping ads on Google have steadily evolved and improved, too. It’s now smarter, easier to set up, and delivers broader reach. In this guide we’ll provide a detailed walkthrough of how to set up your products in Shopping Ads. We’ll also explain how to take advantage of its technical advances.
Regardless of your budget or desire to actively manage campaigns, there is a path to success for you with the Shopping tab. Looking to benefit from free placements? Easy. We’ll explain in this guide how to run only free listings. Free listings alone won’t be enough to transform your business, but they’re a great start. Want to only pay Google if you actually get a sale rather than paying for each click? That’s possible too, with Shopping Actions. Or maybe you want to benefit from all that Shopping has to offer. We’ll also show you how to leverage standard shopping and smart shopping campaigns for maximum customer acquisition and growth.
Here are some important questions to consider that we’ll answer in this guide:
- How can I reach shoppers with the right message at the right time?
- How can I help Google deliver the best ad-to-query match so that Google shows the right product ad to the best shoppers?
- How can I give shoppers the best ad-to-landing-page experience possible?
- How can I properly track ad performance so I’m constantly growing and improving?
🔍 Navigate this guide
- What are Shopping ads and where do they appear?
- 3 ways to get your products into Shopping results
- Building blocks of great Shopping ads
- Reach and robots: understanding networks and Google Smart Bid technology
- Conversion tracking setup: Do this before creating your first campaign
- Campaign creation: 4 ways to build your Shopping campaigns
- Going beyond the keyword: adding audiences to your Shopping campaigns
- Making your ads irresistible: Adding product reviews and product promotions
- Leveraging your merchant feed to run dynamic remarketing ads
- No time like the present: Get started with Shopping now
What are Shopping ads and where do they appear?
Shopping ads, sometimes referred to as Product Listing Ads or PLAs, are the product ads that appear in Google Search results.
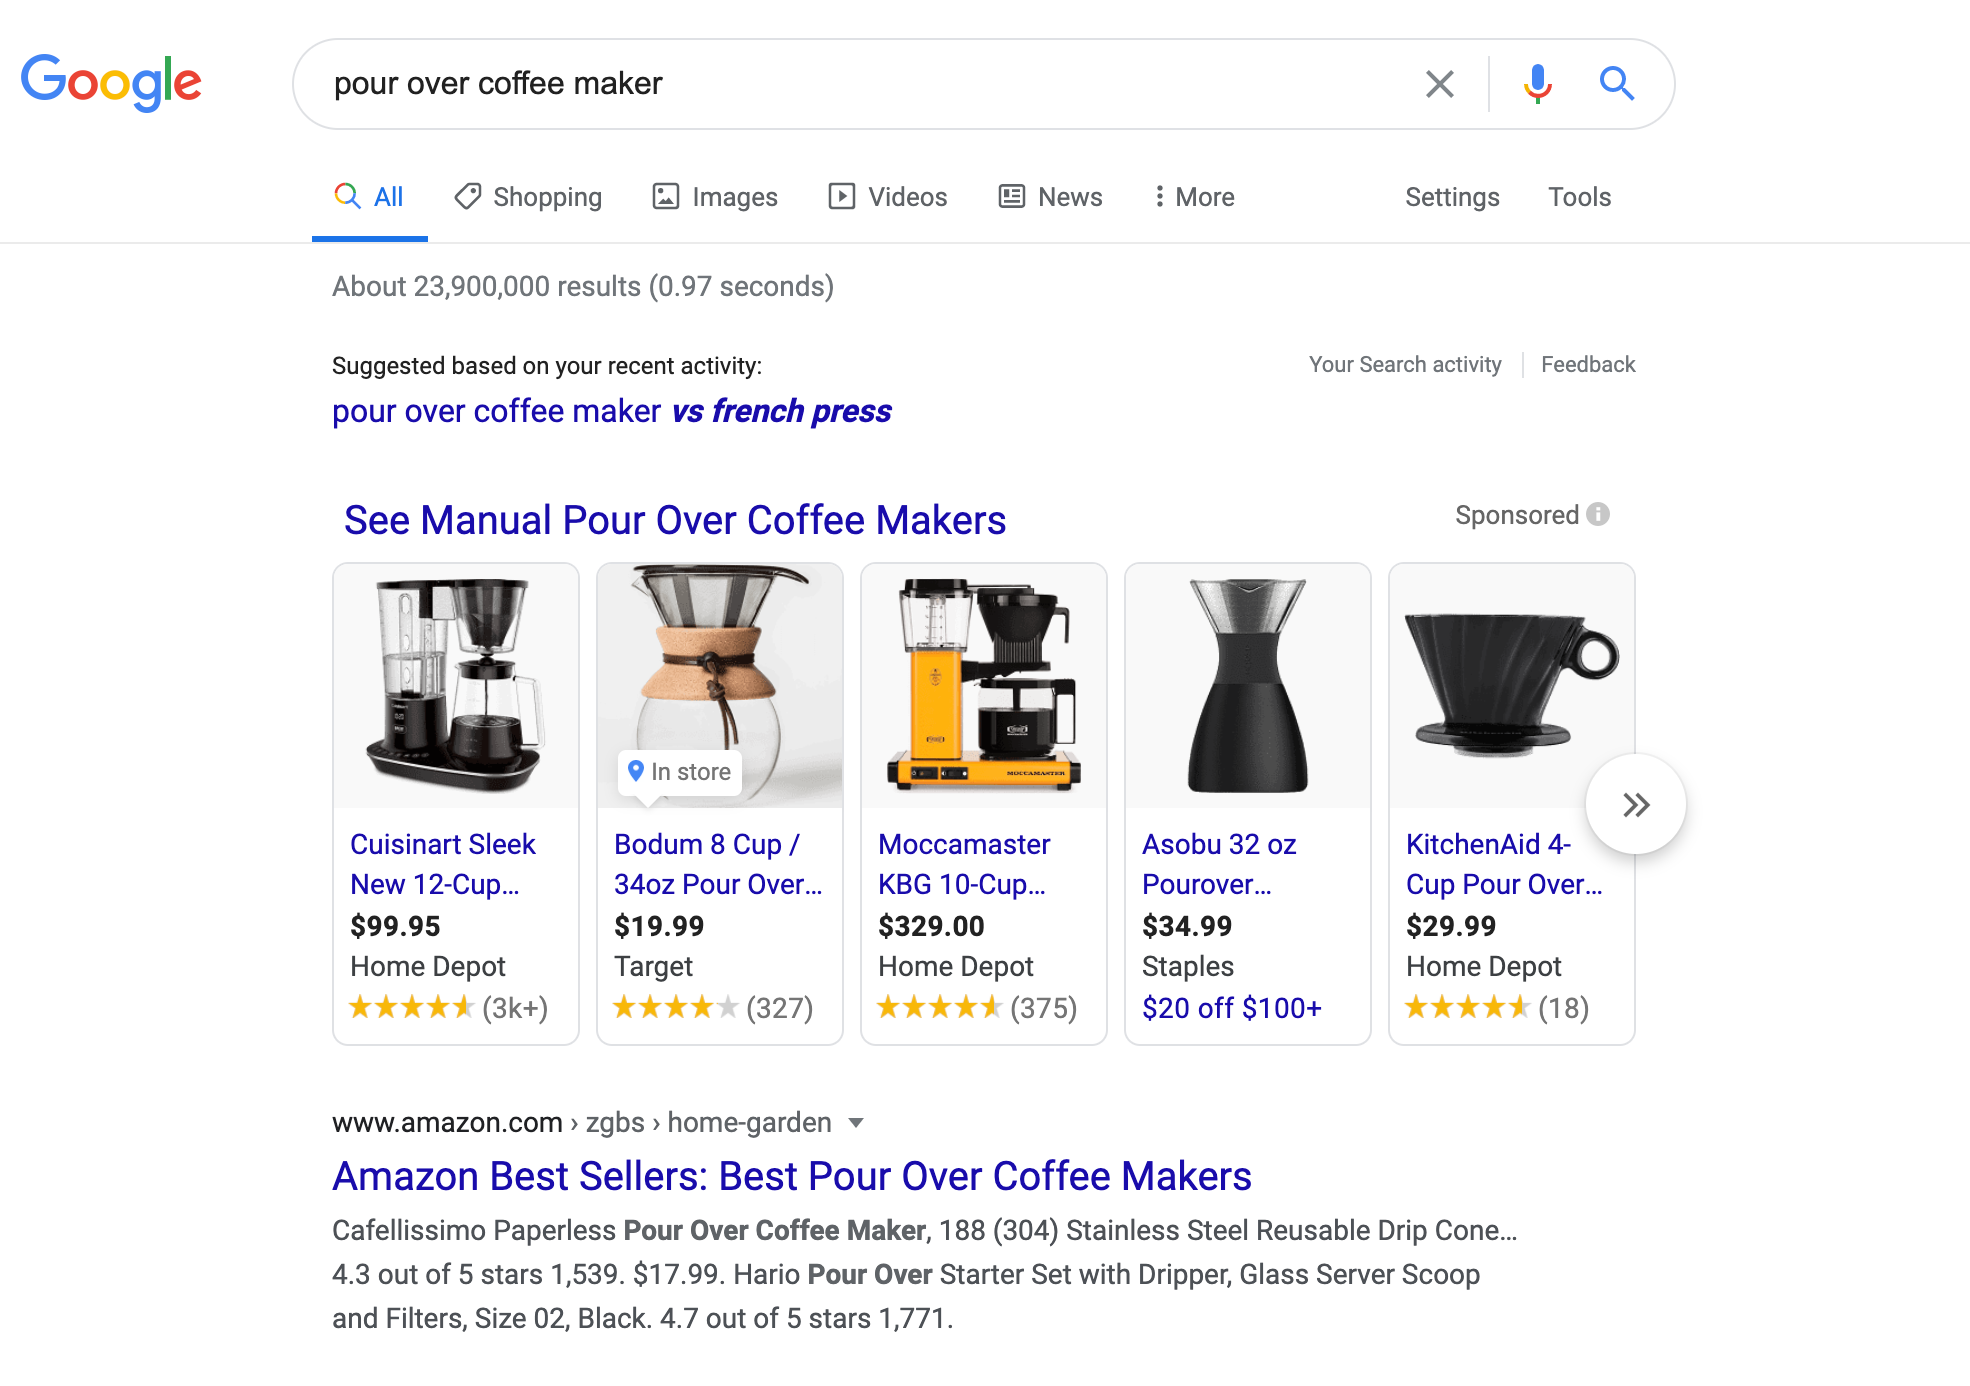
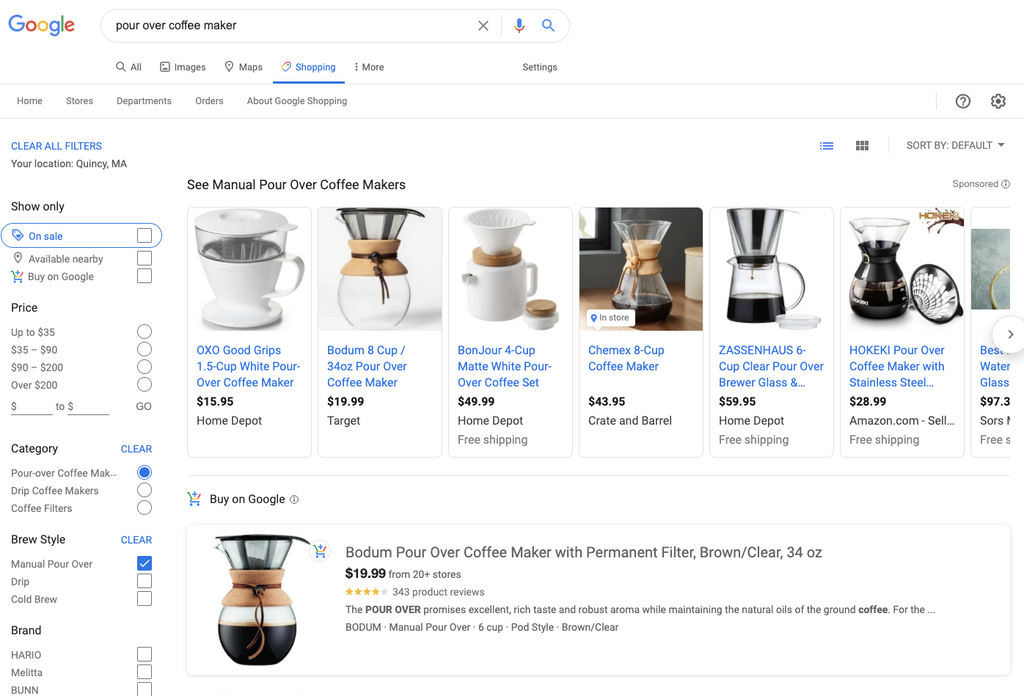
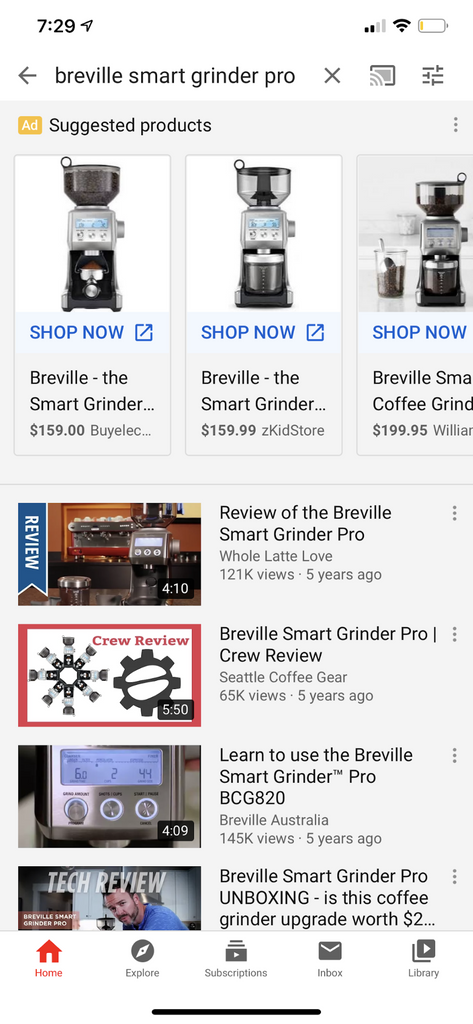
Shopping ads don’t only appear in Google’s standard search results anymore. They are also visible on the Shopping tab, on search partner websites, in the price comparison Shopping service and apps (iOS and Android), and even on YouTube and the Google Display Network. Because Shopping ads are so useful for shoppers and popular with advertisers, Google has steadily expanded Shopping’s reach, and that means more opportunities to reach shoppers.

Shopping ad campaigns in Google are powered by two platforms: Google Ads and Google Merchant Center. Google Ads is where your shopping campaigns live and where you set your budgets, manage your bids, gain insights, and make optimizations. Google Merchant Center is where your product feed is stored, along with details about shipping and sales tax. We’ll explain product feeds momentarily. For now, they’re simply details about your products organized in a format Google likes. Your product feed is what Google uses to build your Shopping ads.
The setup and management of Shopping ads is quite a bit different from the setup of traditional text ads. With text ads, you create campaigns, ad groups, and ads focused around chosen keywords. With the Shopping tab, Google uses your feed, your site, and more to determine what search queries will trigger your ads. Because of this, setting up your product feed has some strong similarities to SEO.
Success with Shopping in Google really comes down to three things:
- Creating the best, most relevant ads possible through an optimized product feed.
- Building a campaign structure that fits your desired level of control while still getting the best from Google.
- Getting clear reporting data so you can make sound optimization and growth decisions.
We’ll dig into the step-by-step details of Shopping shortly. First, I think it’s important to discuss your goals. Without knowing your goals, it’s pretty hard to map out a strategy and a road map.
Setting goals and knowing your numbers
Setting goals keeps you on track while giving you the freedom and creativity you need to problem solve and achieve what you want. Here are a couple of things to consider when setting your goals:
What is your target return on ad spend (ROAS)?
For every $1 you spend on ads, how much in sales do you need to generate? The answer to this question will be influenced by a number of factors: your margins, the lifetime value of a customer, and your growth goals, to name a few. For easy math, let’s say you sell a product for $100 and your margin is $50. If you were to get a 100% return on ad spend (ROAS) then you would actually be losing money initially.
$100 in sales - $100 in ad cost - $50 in cost of goods = -$50.
So to break even in this scenario you would need to generate $150 in sales for every $100 spent on ads. Put another way, this is $1.50 in sales for every $1 spent on ads, or 150% ROAS. If you need to generate $3 for every $1 spent on ads, that’s a 300% ROAS. I recommend you calculate your break-even point, and then set a ROAS target. Know that a lower, more aggressive ROAS target means you can bid more aggressively and likely generate more sales volume through your Shopping campaigns. A higher, more conservative ROAS goal will mean efficient and focused Shopping ads with smaller scale. There’s no right or wrong approach.
Build a customer or make a sale?
There are two types of merchants: those who want to generate sales (transactional focus) and those who want to build customer relationships. Both approaches can make money but only the later can really build a lasting business and brand made up of customers you can sell to again and again—and who hopefully will refer more customers to you. The Shopping tab could work for you either way, but your approach will dictate how aggressive you can be in your bidding and optimization efforts.
Paid listings, free listings, and free Buy on Google listings
When Google first made the announcement that some free shopping listings were returning to Shopping results, many ecommerce merchants had flashbacks to the days of Froogle—a time when all products were free to list. While the inclusion of free product listings into the Shopping results is great for new commerce entrepreneurs, it’s still beneficial and even necessary to invest in Shopping ads if you want to get the most from Google’s online shopping traffic. Let’s examine the differences between free and paid listings and talk about why paid listings will still likely make sense for you.
Paid placements
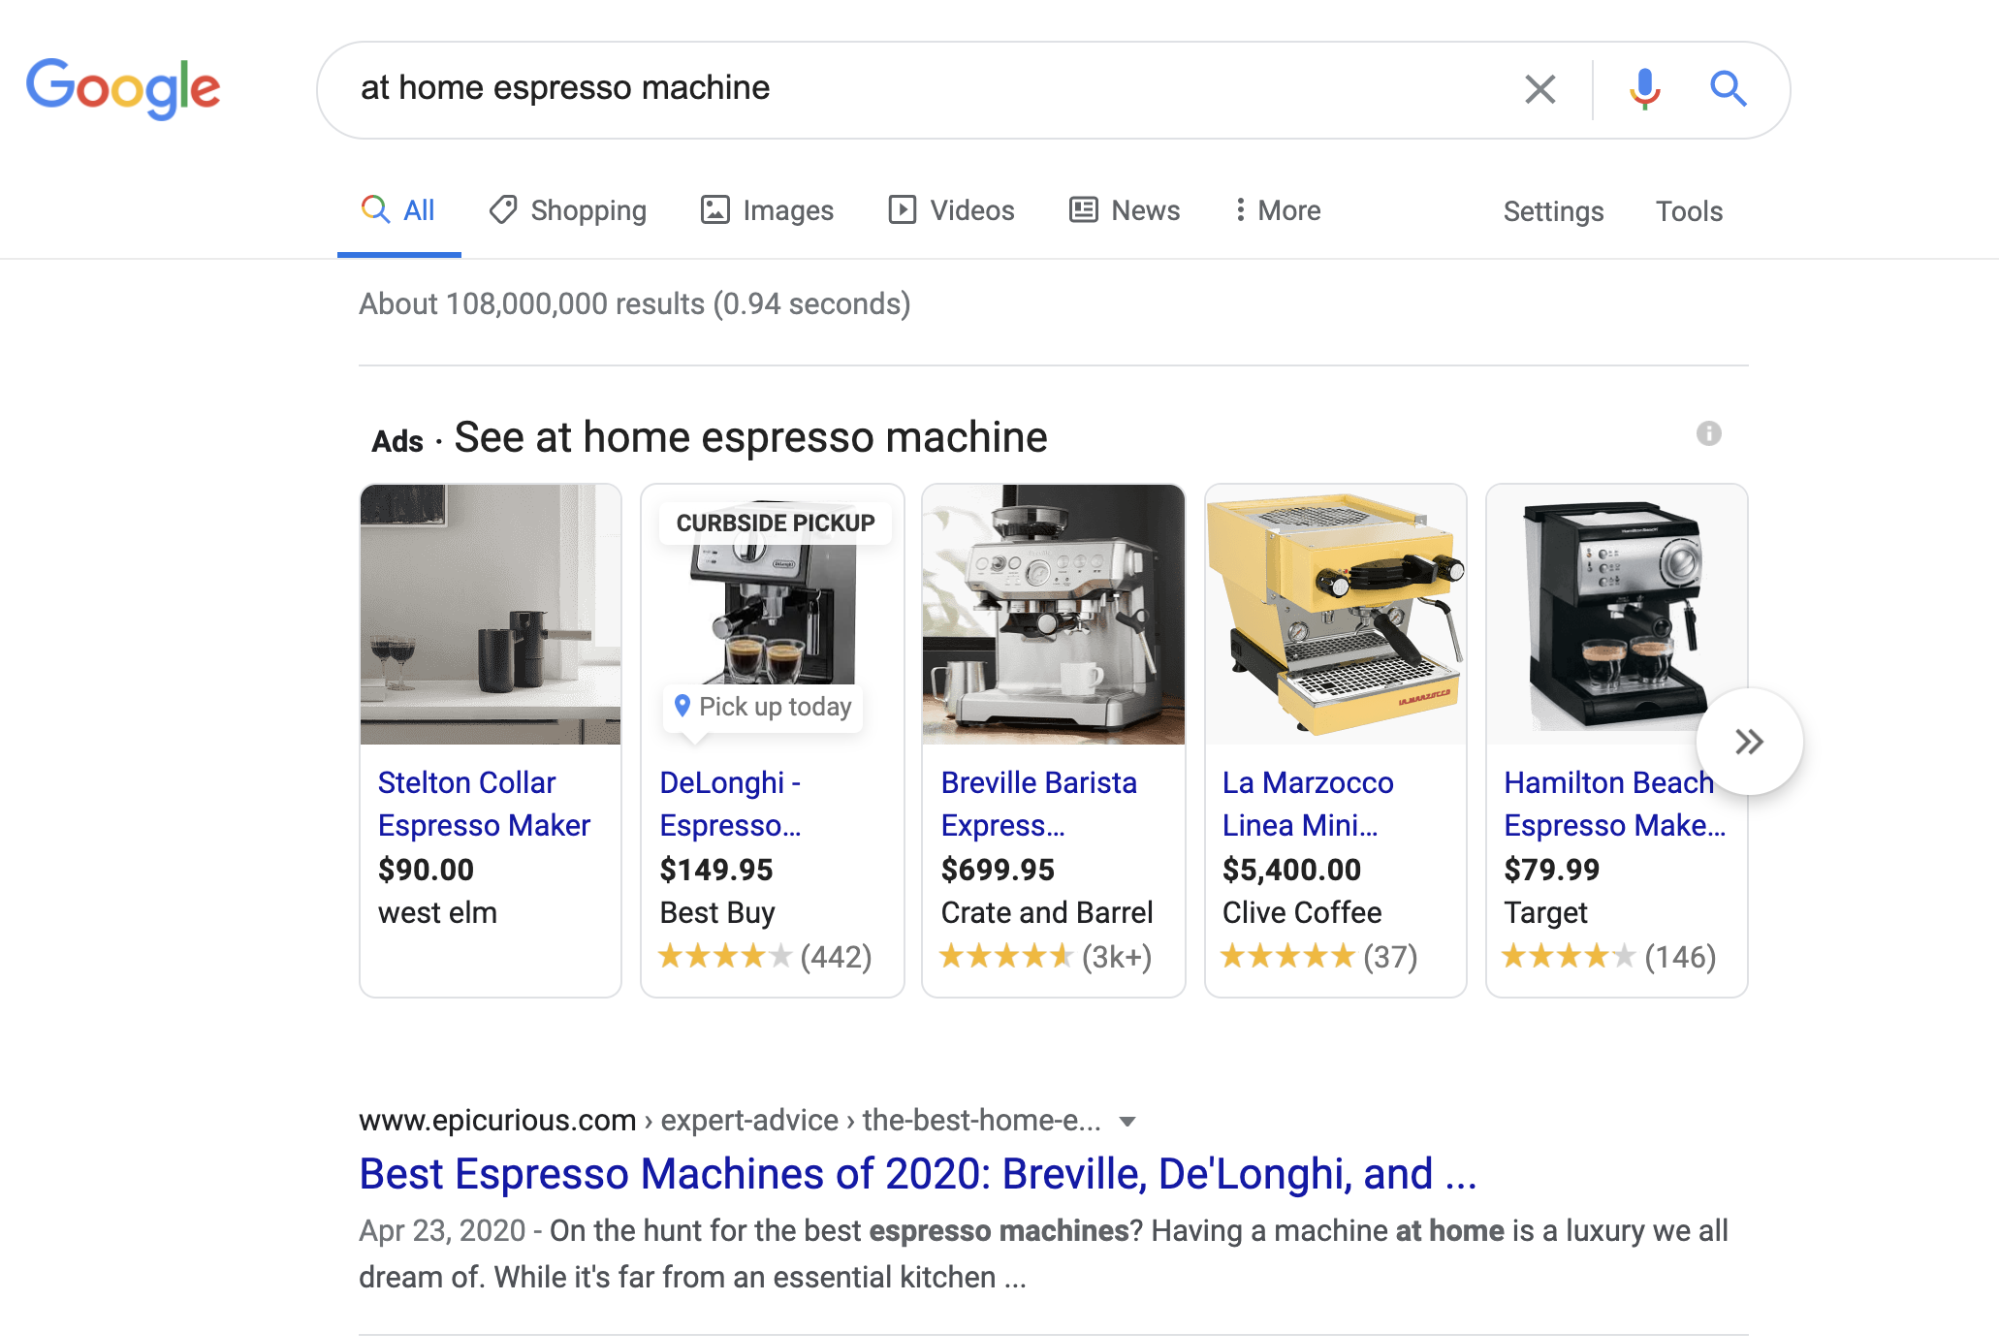
The most prominent positions in Shopping results will remain paid. Most importantly, all of the results that appear on the main Google Search results page are still 100% paid. These product listings get the lion’s share of the clicks for any product search. If you’re looking for some volume with your Shopping efforts, you’ll still need a paid approach. I’m a coffee and espresso junkie. Since this guide is a comprehensive read, it feels like a coffee focus for our Shopping ad examples would be appropriate.
Free listings
Free Shopping placements are available on the Shopping tab and in Google Images results, Google Lens, and more. Since April of 2020, when it introduced free listings, Google says it has seen a 70% increase in clicks and 130% increase in impressions, on average, across both the free listings and ads on the Shopping tab in the US.
This sounds impressive, and it is, but traffic from free listings alone might be pretty limited for most merchants. Even on the Shopping tab, the most prominent listings are still paid. The top row of product results are sponsored listings, and the free listings begin below them.
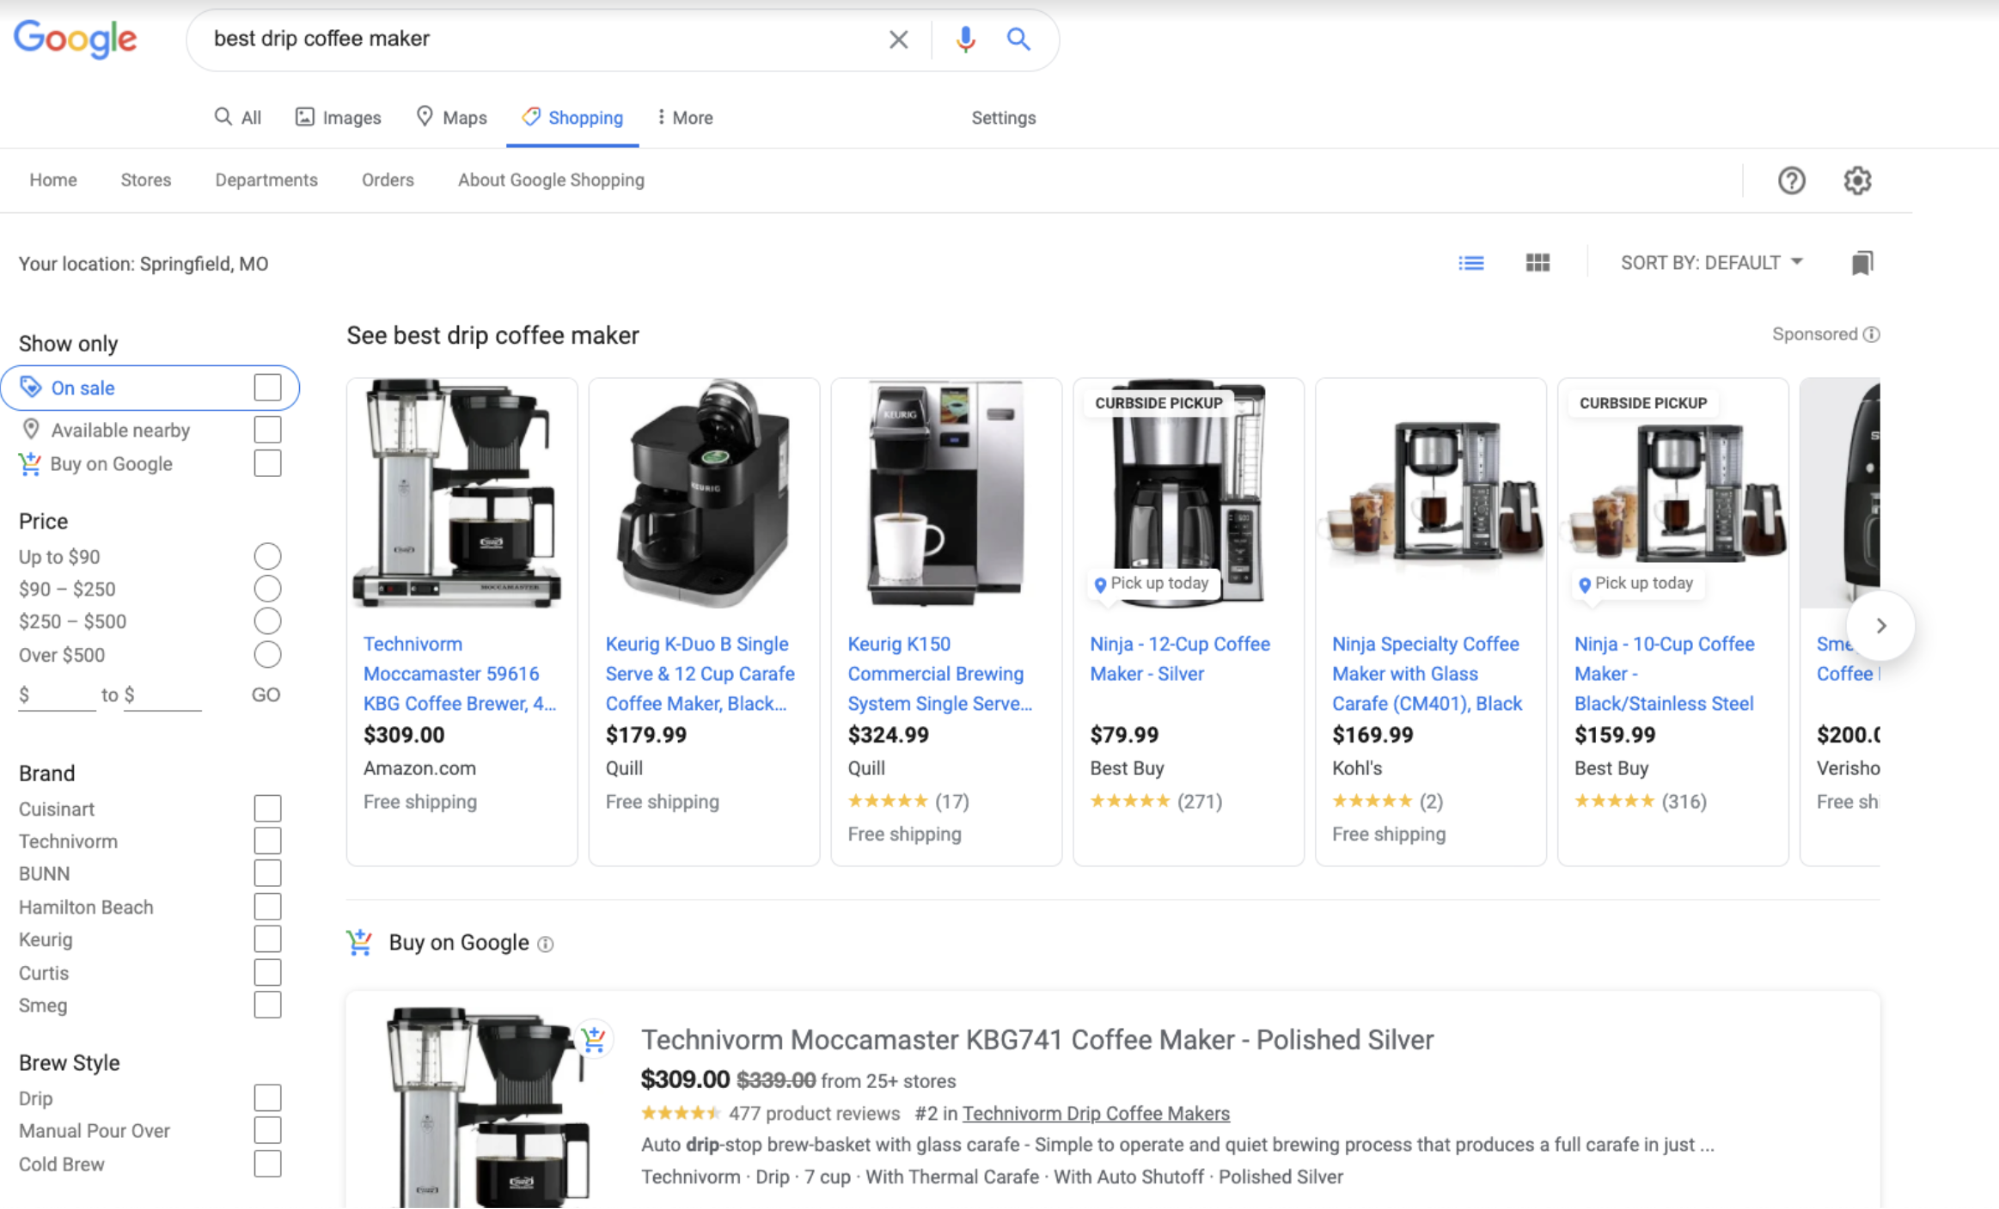
While free Shopping listings likely won’t completely transform your business, they can make a difference. And since they’re free, they could be a great way to dip your toe in the Google Shopping waters and reveal your potential for paid ads.
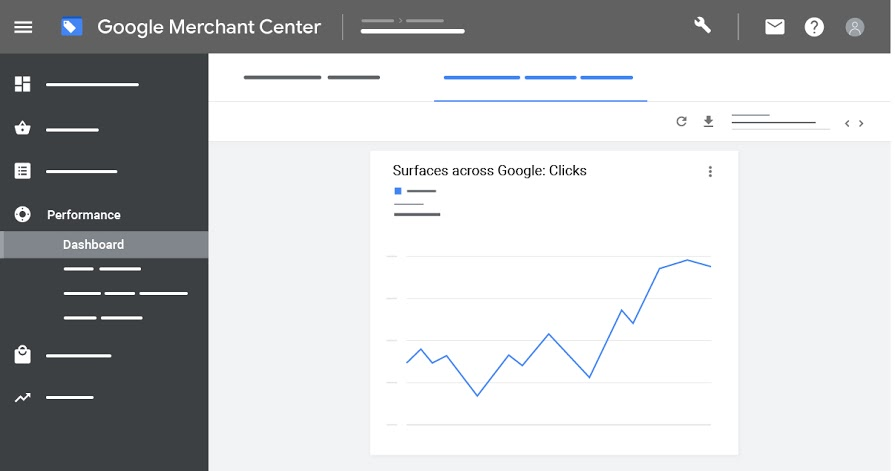
You’ll be able to measure performance for your free listings inside Merchant Center under ”Reporting for surfaces.”
Promote your products across Google with Shopify's Google channel
Shopify’s Google channel makes it easier than ever for retailers to get their first sales from Shopping Ads. The Google channel app for Shopify can help you get a feed up and running fast, and get your products in front of customers. Create a Smart Shopping campaign with ease and list your products for free using Shopify’s Google channel.
Install Google ChannelShopping Actions (Buy on Google) - 0% Commission in the US
Shopping Actions is a program that allows you to display your products to shoppers in multiple places, and allows shoppers to “Buy on Google.” Buy on Google means shoppers are giving Google their credit card info and Google is processing the order. Then Google sends order info to the merchant so they can fulfill it. Buy on Google items feature this icon: ![]() .
.
These ads appear in standard Google Search results, in the Shopping tab, on YouTube, in Google Images, via the Google Assistant, and in the Shopping app. Shopping Actions used to be a commission-based option where Google would collect a 5%–20% fee on the sale of the item. Now, Shopping Actions is commission-free in the US.
Here’s how Shopping Actions works:
- A shopper clicks your Shopping Actions listing.
- Google collects the full price of the item, plus sales tax and any applicable shipping charges.
- The order is sent to you via Google Merchant Center.
- Google pays you for the transaction.
- You pack and ship the product to the end customer.
To be eligible for this program, Google has some requirements. It wants a consistent shopping experience for all shoppers. If you want to take advantage of Shopping Actions, be prepared to commit to these requirements:
- Accept returns for at least 30 days after every purchase
- Process refunds within two days
- Follow all other Shopping campaign policies.
Creating a Google Merchant Center account
Google Merchant Center is where your feed lives. It’s also where you can set tax and shipping rules, all of which are required before running Shopping ads.
Here are a few tips for setting up your Merchant Center account:
- Have access to your domain registrar. You’ll need to verify that you own your site and then claim it for use in Merchant Center. The easiest way to do this is by logging into your domain registrar and giving Google access. This can all be done directly from Merchant Center.
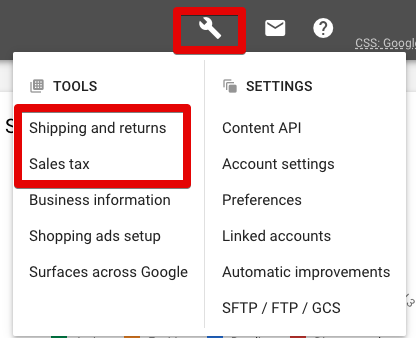
- Know your tax and shipping settings. You’ll need to set up both tax and shipping rules under General Settings in Merchant Center. For sales tax, you can enter your rates directly or pick the states you charge sales tax in and allow Google to determine the rate. For shipping, you can choose between a flat rate (which could include free shipping), a rate calculated based on the carriers you use, or a rate based on a rate table or rules.
- Link Merchant Center to Google Ads. Under Settings and Ads, click Account Linking. You’ll need a 10-digit Google Ads ID, and you’ll need to be logged in with an email address that has admin access to both Merchant Center and Google Ads.
If you don’t already have a Google Ads account, you need one. While this guide focuses on Shopping, it's worth also checking out Shopify’s guide to setting up a Google Ads account.
Mastering product feeds: the building blocks of great Shopping ads

If you want to maximize free listings, get the most from your paid campaigns, and give your Shopping Actions campaigns the best shot at success, first you need to build a great product feed.
With Shopping ads, everything begins with a product feed. The product feed is the information Google uses to build your Shopping ads or listings. When it comes to feeds, you can create a manual feed using Google Sheets. Just add in product details in the format that Google requires. This option is great if you have a handful of SKUs, since keying in information about each product is a bit labor intensive. Or you might consider a feed tool like GoDataFeed or DataFeedWatch to automatically pull data from your store to generate your feed. This is often the preferred method if you have hundreds or thousands of SKUs. Or you can use an app like this one, made for Shopify. Before your start building, here are some powerful feed tips to consider:
Top feed tips
As we discussed in the beginning, with Shopping ads on Google, you don’t bid on your keywords. Instead, Google crawls your feed and your product details pages and then decides what keywords your products are relevant for. So optimizing key elements of your feed is crucial to ensure your product shows for your desired keywords. While you should consider all Google product feed requirements, let’s dive into what’s most important and what will move the needle for you.
Product title
This is arguably the most important part of your feed. Your product title is important because it (along with your product image) communicates instantly to your shopper what your product is. Your title also tells Google what your product is, so it know when to show your products to shoppers.
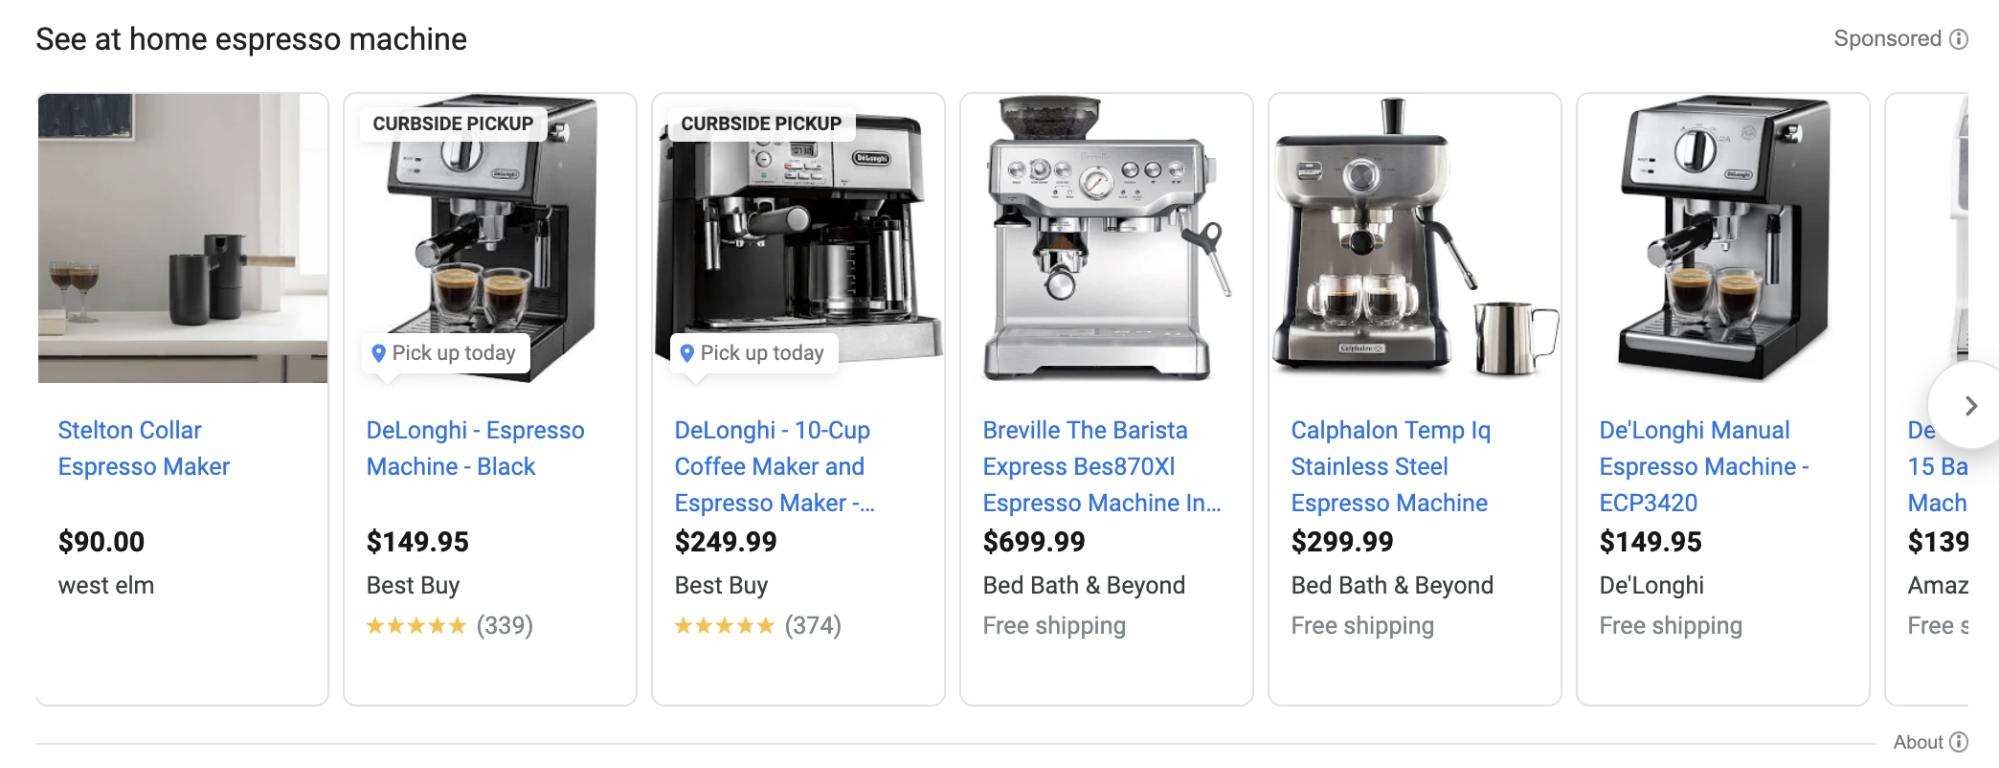
When crafting your product title, it’s important to use the actual name of the product, along with your top keyword and other important information, like color, model number, size, etc. Basically, you want to include the most important product details that shoppers want to see. You have a 150-character limit with the product title field. Google puts more weight on words that appear first in your title, so consider your structure and word order here carefully.
Weak Title: Breville Espresso Machine
Good Title: Breville Barista Express BES870XL Espresso Machine with Dual Burners—Stainless Steel
If you’re using a manual feed, you can carefully craft your desired product title. If you’re using a feed tool, you can create rules to stack different attributes to form a powerful title. For example, you could create a rule that combines product name, brand, color, model number, size, and more to form a powerful and detailed product title.
Product description
Product description is an interesting part of your feed. Initially it was considered super important. Then, for a few years, experts speculated on whether it was important at all. Now, it’s back to being considered important. This field is mainly visible to shoppers on the Shopping tab. Your description isn’t visible on the main Google search results page, but Google also scans it to make sense of it. If you’re going for free listings, they’ll show up on the Shopping tab, so descriptions are key. (Free listings must have a product description, so you may as well make it a good one.) Make this relevant and mention a keyword or two. Think about what features and benefits are most important and mention them here. You’ll need to keep this pretty short and to the point.

Google product category
For your product category, you are picking from Google’s taxonomy. Pick the closest fit to your product to help guide Google in understanding what your product is so it knows when to show it to shoppers. This is an important field but not as important as product title or product type. For example, if you sell dresses, you could use the category of Apparel & Accessories. But it would be more relevant to choose Apparel & Accessories > Clothing > Dresses.
Google product type
This is a free-form field, meaning you can do almost anything you want with it. It’s also shown to really impact what keywords you show up for. So use it wisely! I recommend you put your top keywords in your product type. Product type isn’t visible to shoppers, only to Google.
Images
Other than price, your product image will probably influence the amount of clicks your products get more than anything else. Google prefers product images with plain white backgrounds, but images of the product in its intended setting work too. Remember, your image will appear as a thumbnail, so make sure it’s cropped properly to show off your product’s important features. It’s hard to overstate the importance of good images. I recommend you read Google’s requirements and recommendations in their entirety.
Product highlights
If you also sell on Amazon, think of product highlights like your product bullet points on your Amazon product detail pages. You can include as many as 10 highlights per product. Google recommends four to six highlights. Each highlight can be up to 150 characters.
Sales price annotation
If your product is on sale, Google will highlight this fact and that there’s a price drop. To keep merchants honest here, Google requires you have a base price (think non-sales price) that you actually charged for at least 30 non-consecutive days in the last 200 days. Your sales price then has to be at least 5% less, but not more than 90% less, and Google will show the sale annotation.
Product details
This is where you can provide additional product information not covered in other attributes. This is a great place for technical specifications like product dimensions or compatibility if those are important bits of information and not covered elsewhere in your feed.
Price
While a good image will grab someone’s attention, it’s usually the price that has the most influence over whether they click. This is especially true if you’re selling the exact product other retailers are selling. It’s also true if you’re selling products in an area where customers are price sensitive. In these cases, having a higher price can severely handicap your listing. If your product is unique or has obvious advantages over the competition, a higher price can actually help attract the right clicks. For example, a client who sells custom vehicle lights will target buyers looking for quality lights that will make their vehicle look unique. They are not targeting bargain shoppers. For this client, many high-end consumers will use the same search queries that bargain shoppers use. In this scenario, a higher price relative to the competition can actually help them get clicks from the right buyers.
Other important feed items
Brand
Whether you’re offering your own brand or a reselling someone else’s, you need to indicate the brand of every product in your feed. A lot of products are searched for by brand, especially by people with a high intent to purchase. Also, having your brand name appear in your Shopping ads is good for your branding efforts.
Apparel categories
If you are selling apparel, you need to provide a few additional data points, including the following (for a complete list of what is required for different apparel products, reference Google’s guide):
- Gender: male, female, unisex
- Age group: newborn, infant, toddler, kids, adult
- Size: either a number or small, medium, large, etc.
- Size type: regular, petite, plus, big and tall, maternity
- Size system: US, UK, EU, etc.
- Color
Manufacturer’s product number and global trade identification number
In North America, a global trade identification number typically is your UPC (or ISBN for books). In the past, Google only required two out of these three fields for all products in a feed: brand, MPN, and GTIN. Now, a GTIN is required for any product a manufacturer assigns one to. If you resell products, you need to inquire with the manufacturer about GTINs/UPCs or you could have items disapproved by Google.
Sales tax and shipping
You can specify the rates and states in which you charge sales tax, as well as shipping rules, in the Account setting inside Google Merchant Center. For both, it’s usually better to set up rules in Merchant Center than to fill in fields for each product. Inside Merchant Center you can set up free shipping, flat rate shipping, and carrier calculated shipping.
Other required information
These data points are quick and easy to add. They’re also required—if you leave one out for a particular product, that product will be ineligible to appear in Shopping results.
- Availability. Accepted options are “in stock,” “out of stock,” and “preorder.”
- Condition. Accepted options are “new” and “used.”
Custom labels
Custom labels are for your benefit only but can help greatly when trying to build campaigns or optimize bids. When launching a new campaign in Google Ads you can group your products by brand, category, custom label, or a few other attributes. Labels are optional, but in many cases it helps to create labels that describe attributes to your product that might make building campaigns easier. You can add labels like Top Sellers, Spring Category, and Holiday for easy filtering later in campaign setup.
Reach and robots: understanding networks and Google Smart Bid technology
Shopping ads on Google have changed a lot in recent years, both in terms of ad placements, as we’ve discussed, but also in terms of smart technology. I’m going to refer to these to advancements as reach and robots.
As far as reach goes, Shopping ads can now appear in all the places mentioned above. More ad placements means more opportunities for you to reach potential shoppers. For standard Shopping campaigns, you can control where your ads appear by adjusting the network settings. For Smart Shopping campaigns (which we’ll cover in the next section), you get all available networks, without the ability to opt out of anything.
With robots, Google has steadily been adding more machine learning and artificial intelligence to both campaign setup and management, namely in the form of Smart campaigns and Smart Bidding. We’ll discuss Smart campaigns in a moment. First, what is Google’s Smart Bidding?
Smart Bidding uses machine learning to analyze millions of signals in a fraction of a second to adjust bids to help hit your targets. Smart Bidding uses “auction-time bidding,” which means it adjusts bids in real time for each individual shopper. So for every shopper who types in a keyword that might trigger your ad, Google is adjusting the bid based on how likely they think that person is to buy.
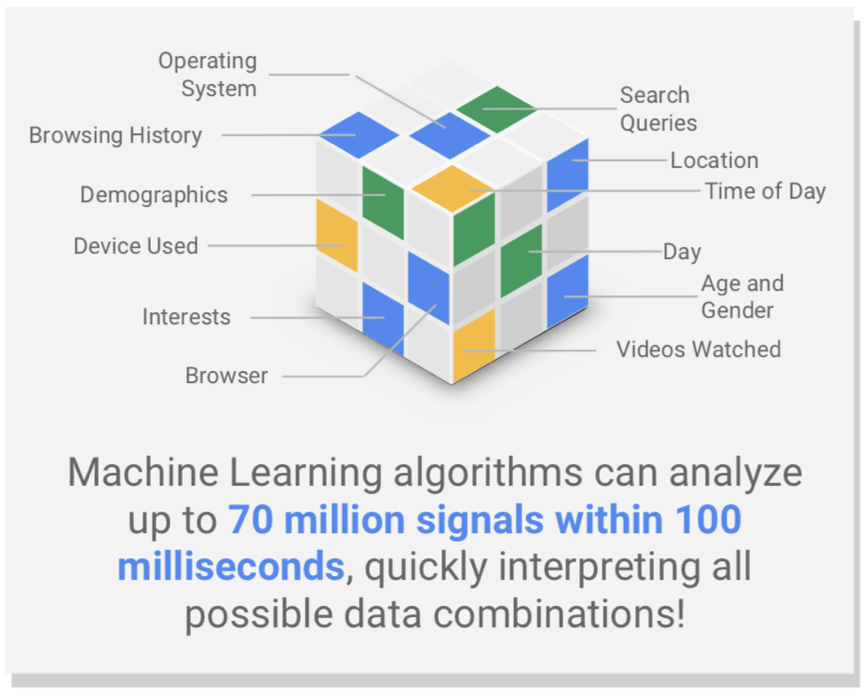
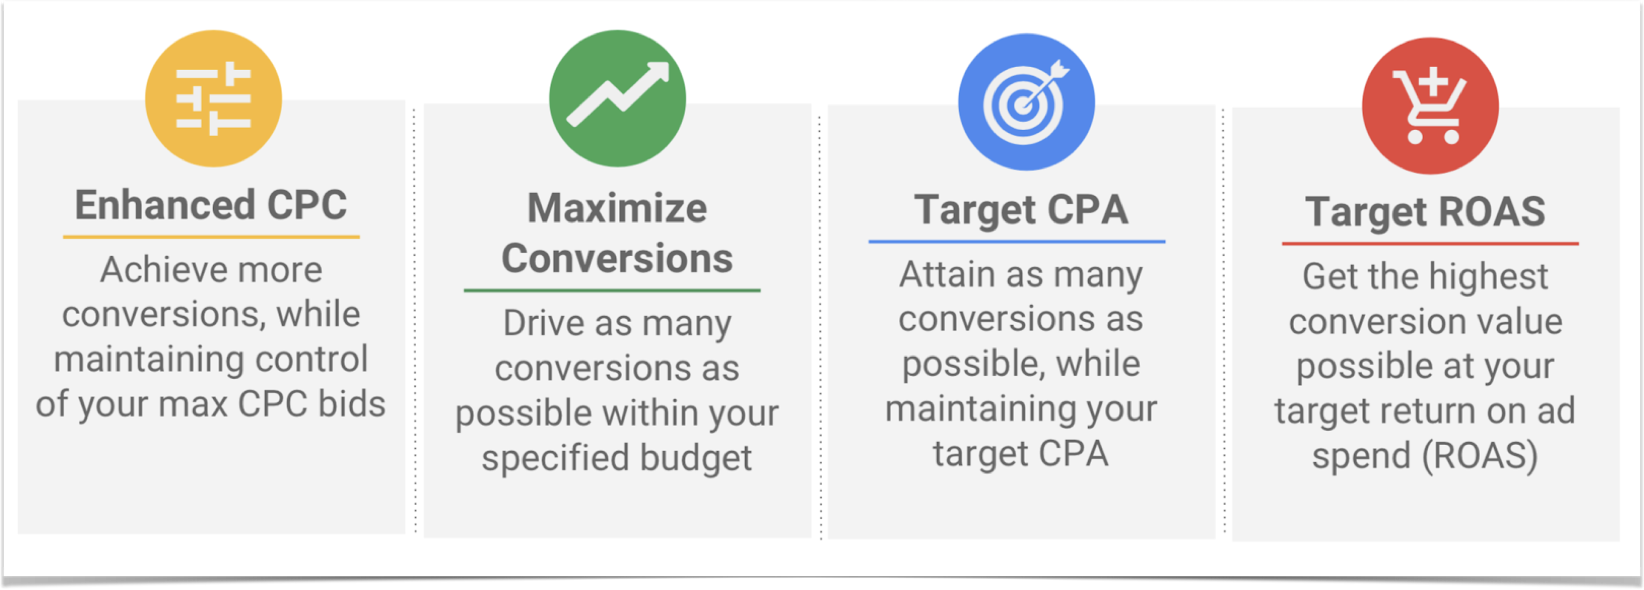
In the vast majority of cases, I recommend you use Google’s Smart Bidding options. For Shopping campaigns, that will mainly be either Target ROAS or Maximize Conversions.
Conversion tracking setup: Do this before creating your first campaign
Conversions are the lifeblood of your Shopping campaigns. Without conversion data, you won’t be able to evaluate performance or optimize campaigns. Without solid conversion tracking, Smart Bidding and smart campaigns will be out of the question. If you don’t have conversion tracking set up at all, the option to use Smart campaigns or Smart Bidding won’t be available to you. If your conversion tracking is off, then the Smart bidder will be flying blind, not knowing exactly what products are selling or who’s buying.
It’s important that you rely primarily on the Google Ads conversion code rather than importing conversions from another source, like Google Analytics for example. Google Analytics will potentially under-report conversions from Google Ads because its default is last-click attribution. You want to feed the Smart Bid algorithm the most accurate and complete data. Using Google Ads, conversion codes accomplishes that.
Here’s a quick guide on how to set up Google Ads conversion tracking for Shopify.
Campaign creation: 4 ways to build your Shopping ad campaigns

1. Smart Shopping campaigns give you a hands-off approach
If you’re looking for the easiest setup and the least amount of ongoing work, Smart Shopping campaigns is your best approach. Smart Shopping campaigns need a few inputs to get started. They require an approved feed, a daily budget, some geographic targeting, and your desired ROAS. You can also skip the specific target ROAS and just choose to maximize conversion value. After that, Smart Shopping does its thing. Smart Shopping works to get you impressions and clicks from would-be buyers while respecting your daily budget and aiming for your target ROAS.
Pros
If you have an optimized feed, as we discussed above, then Smart Shopping campaigns generally work pretty well. Often they work as good as or sometimes better than standard Shopping campaigns. The real advantages here are the setup is a breeze and ongoing management is almost non-existent. Also, Smart Shopping campaigns include dynamic remarketing ads. So you don’t have to set up a standalone dynamic remarketing campaign. Smart Shopping takes care of it. You’ll need to check in from time to time and make sure you don’t have any feed issues, and you may want to adjust your ROAS targets occasionally if performance isn’t up to snuff. Aside from feed updates or issues or changes in ROAS targets, Google handles the rest.
Cons
Smart Shopping campaigns will likely frustrate you if you’re a control freak. There’s less data visibility and fewer levers to pull to optimize performance. For example, you can’t add negative keywords, you can’t run a search term report, and you can’t have more than one ad group.
Tips
ROAS targets can be either set at the campaign level or the ad group level. Since you can only have one ad group per campaign, essentially every product in a given Smart Shopping campaign will have the same target ROAS. If your profit margin is consistent across products, then having all products in the same campaign might be fine. While you can’t have more than one ad group in a campaign, you can have multiple Smart Shopping campaigns running at the same time. It’s usually best to create a separate campaign for each group of products that have similar ROAS goals. For example, let’s say you sell sneakers and socks. It might be best to create a campaign for sneakers and a separate campaign for socks. That way, you can set a unique ROAS for each category. Setting up separate campaigns for different categories or groups of products also allows you to control budgets for each category and get better visibility into what categories are selling.
How to set up a Smart Shopping campaign
Click to create a new campaign, then choose Sales as your campaign goal, select Shopping as your campaign type, select your Merchant Center, choose the countries where your products are sold, then select Smart Shopping as the campaign subtype.


Then name your campaign, set your daily budget, and provide details about ROAS targets.

Next, select your product groups. The default is “All products,” which includes all approved products in your feed. Or you can choose only certain products based on Category, Brand, Product type, Custom label or Item ID.

Add images and a logo so Google can build dynamic remarketing ads for you.

Now you’re off to the races. Be sure to check into Google Merchant Center for feed metrics and check Google Ads for performance metrics.
2. The assisted approach (part human, part robot)
Maybe you like the idea of leveraging Google’s Smart Bidding technology but the idea of completely turning over the keys to Google scares you a bit. Or maybe you like the idea of seeing more data. If you’re a “show me the details” or “let me pull some levers” kind of person, then this could be your approach. In this setup we’ll choose a standard shopping campaign, which gives us all of our normal areas of control, such as network, bid type, etc., but we’ll also enable Smart Bidding. Now you can have a robot sidekick.
Pros
This is truly a best of both worlds setup. You still have some control, but you’re letting the machine do what it does best: bid optimization. You’ll still be able to add negative keywords, launch multiple ad groups in one campaign, choose your networks, and more. You’ll also benefit from more data visibility, including a search term report, which isn’t available for Smart campaigns.
Cons
You’ll need to and likely will want to pay a little more attention than you would with a Smart Shopping campaign. Other than that, there really are no cons with this approach. You retain control and data visibility. To enable target ROAS, your account has to have generated at least 15 conversions over the last 30 days. If you don’t meet that conversion threshold, you’ll need to start with manual bidding and transition to Smart Bidding later.
Tips
- Create a separate campaign or at least a separate ad group for products that have similar ROAS. That way, you can let Google optimize to hit a target ROAS that is appropriate for each category or product group. Unlike Smart Shopping campaigns, a standard campaign can have multiple ad groups. And target ROAS bids can be set at the campaign or ad group level. The decision on whether to segment your product categories into multiple ad groups in the same campaign or into separate campaigns really comes down to a budget decision. Budgets are controlled at the campaign level, so if you need a different daily budget for one product category versus another, then setting up separate campaigns is the way to go.
- Expand to other networks. We typically see good performance in terms of increased scale at an acceptable ROAS when shopping campaigns are expanded to different networks. If efficiency is the name of the game for you, you might want to stick with Google Search and Search Partners Only. If you want to be aggressive, then you can start with YouTube and GDN. Or you can add it later.
How to set up an assisted Smart Shopping campaign
Choose Sales as your campaign goal, then Shopping as your campaign type, select your Merchant Center account, select your country to sell products, and choose Standard Shopping as your campaign subtype.


Then enter your campaign name, select Target ROAS as your bid strategy, and key in a desired ROAS.

If you want to go for efficiency rather than reach, uncheck the Search Partners and uncheck Include YouTube, Gmail, and Discover. However, we often see good results from both of these networks options, so if you want to be a little more aggressive, it’s OK to leave these boxes checked.

Next, choose Single Product Ads and decide how you want to segment your first ad group by either choosing All Products or subdivide by attributes, like Category, Brand, ID, or Custom label.

When to use Showcase Shopping ads
Showcase Shopping ads display for broader, higher-in-the-funnel search queries. They display for searches where a collection of products might help a shopper more than specific products.
We’ve found these ads to work well for certain categories of products, especially Apparel and Accessories, and Furniture and Home Decor. So these can be effective, but the ROAS is almost always lower for Showcase Shopping ads. They can still play an important role in your ad strategy, however. Currently Showcase Shopping ads don’t appear for all product categories. Furniture, Apparel, Accessories, Electronics, Home Decor, and few other categories allow for Showcase Shopping ads.

3. The no-risk, lower-reward approach (free listings)
Maybe you’re all about eliminating risk. Maybe the idea of paying for clicks with no guarantee of conversions (now matter how impressive Google’s new technology is) concerns you. Or maybe you just want to dip your toe in the Shopping water without putting any cash upfront. If you’re OK with this safe but slow-growth trajectory, then the no-risk, lower-reward approach is right for you. This is where you only take advantage of free listings and/or commission-based listings through Shopping Actions.
Pros
There’s really no risk here. You either don’t pay at all for free listings or you pay a reasonable commission with Shopping Actions if Google closes a sale for you.
Cons
Your visibility will be fairly limited. As we illustrated above, free listings don’t show on the most prominent placements across Google surfaces. For Shopping Actions (commission based) your visibility will likely be greater than free listings. But unless your product is selling really well, Google is more likely to show either traditional paid listings or Shopping Action products that have a proven sales track record.
How to set up free listings and Shopping Actions
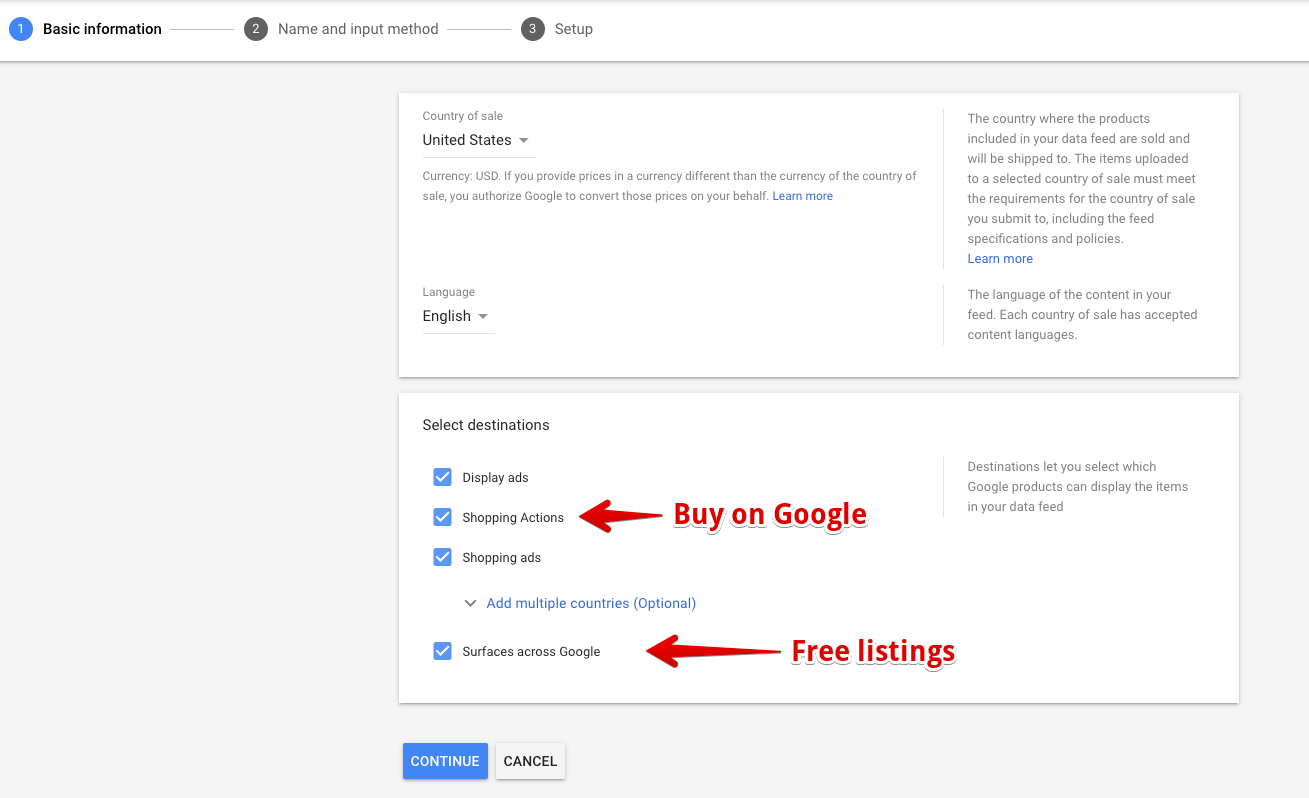
When you add a new feed you can choose your destinations. Shopping Actions are the commission-free listings that allow shoppers to Buy on Google, which we discussed above. Surfaces across Google are free listings that send shoppers to your website, just like paid listings. Select the destinations where you want your listings to appear. The default is for all destinations to be selected, so you’ll need to deselect any destination you want to opt-out of.
4. Driving foot traffic with Local inventory ads (LIAs)
If you have a brick-and-mortar store you can use local inventory ads to drive shoppers to it. Local inventory ads are displayed next to standard Shopping ads and appear when a shopper is in close proximity to your physical store. Local inventory ads are denoted with a “Pick up today” or similar message, like the example below from Lowes.

There are four basic steps to setting up local inventory ads:
- Enable LIAs in Google Merchant Center
- Create and submit a local inventory feed
- Request inventory verification
- Enable local inventory ads in your shopping campaigns
Google will want to verify your in-store inventory and it may choose to do so in person or through a phone call. For more information on local inventory verification setup, check out this Google help article.
Going beyond the keyword: adding audiences to your Shopping campaigns
Remarketing lists for search ads (RLSAs)
What if you could tell Google, “When you see a searcher like this, I want you to bid more”? Say, for example, that someone has been to your site before and made a purchase. Now they are back on Google searching for another product you sell that maybe they don’t know you offer. That’s a shopper you almost certainly want to get back to your store.
Remarketing lists for search ads (RLSAs) are a great addition to your Shopping campaigns.
You will need to add a remarketing tag to your site or use Google Analytics to build a remarketing list. If you use Google Analytics, you might need to update your tracking code.
Then build lists in your shared library. (Lists are basically collections of visitors to your site who meet certain criteria.) You can then advertise to your different lists in different ways if you so chose, such as:
- All visitors, to get a list of anyone who’s visited your site before
- Abandoned cart, for visitors who add something to their cart and leave without buying
- Product viewers, those who got to a product product page on your site
- Previous buyer, those who have purchased before
Customer Match lists
This list type allows you to upload your customer email list to Google to “match” against its users. You can then target these users in a variety of ways and with different channels, from Search to display to YouTube and Shopping. These lists can be useful in helping you target customers who’ve bought from you in the past but may be searching on Google for another product they don’t know you sell. Or maybe they’ve purchased from you in the past but can’t remember your URL or name. Using Customer Match allows you to bid more aggressively when someone on your list is searching for products on Google.
Similar audiences
One of the best reasons to upload your customer list is so you can create a similar audience. This is when Google creates an audience that is similar in behavior to your other remarketing lists. You can create an audience that is similar to your customers (similar to Customer Match) or similar to all visitors or any of your other remarketing lists.
YouTube lists
If you have any video content on YouTube, you might also consider using YouTube lists for targeting. You can often target users who subscribe to your YouTube channel and/or those who have viewed one of your YouTube videos.
Learn more: How to Start a YouTube Channel for Your Business
Making your ads irresistible: Adding product reviews and product promotions
Promotional feeds/special offers
If you’re running a sale or offering temporary free shipping or something special, you can set up a promotional feed that highlights your promotions with blue underlined “Special offer” text. It also usually features a callout at the top of the ad highlighting what the promotion is. In the case of the Adidas running shoes listed below, it’s a 25%-off discount.

When you click on “Special offer” a pop-out appears with a discount code to use to claim the offer.

To set this up, you’ll need to create a promotional feed. In order to do that you must first contact a Google Ads representative and ask to be whitelisted for promotions. Or you can fill out the Merchant Promotions interest form.
After that, you can create your promotions one of two ways:
- You can use the marketing tab in Google Merchant Center, which usually is easiest if you have simple promotions like a sitewide sale.
- If you have different promotional offers that apply to different products, then a promotional feed might be ideal. Click on the +Data Feed button in the feeds area and choose Promotions in the Type drop down.
These special offers can attract attention and clicks and also help with conversions. For more information on setting up promotional feeds, reference the Merchant Center guide.
Product reviews
Product ratings can make a substantial difference in the overall performance of your Shopping campaigns. Think with Google released a stat that searches including the words “best” and “right now” have grown 125% in the recent years. When you add the word “best” to your search query, Google will show Shopping results with the best product reviews.
To incorporate product reviews into your Shopping ads you’ll need to get approval from Google. Start by completing and submitting the product ratings interest form. Google will contact you within 10–15 days of submission with next steps for getting product reviews to appear with your Shopping ads.
Third-party ratings aggregators
Google can integrate with several third-party tools for collecting reviews, including Bazaarvoice, eKomi, PowerReviews, Shopper Approved, Yotpo, and others.
Leveraging your merchant feed to run dynamic remarketing ads
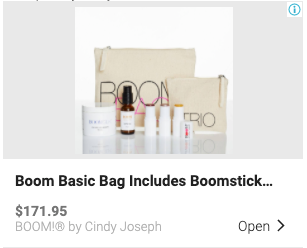
Dynamic remarketing ads allow Google to pull images and information from your product feed to serve highly relevant remarketing ads to your site’s shoppers. The idea is that Google will populate remarketing ads with the products a shopper viewed while on your site. For a full walkthrough of how to create dynamic remarketing ads, visit this Google help article. Dynamic ads can look like these examples:

No time like the present: Get started with Shopping now
Getting the most from Shopping campaigns on Google requires some time and attention to detail, but it’s worth the effort. Product Listing Ads work because they connect buyers and sellers in a very efficient way. This remains one of the most effective platforms to reach new buyers, even though competition is on the rise.
One of the biggest takeaways in a Think with Google study is that customers are open to new brands and buying from new retailers. Shopping is a perfect platform to connect interested and open shoppers with your brand and product line. If you’re looking to grow your customer base and sell more products in a proven, measurable way, there’s no better channel to add to the mix than PLAs. Now go work on your feed, craft a few campaigns, and start making some sales.
Illustration by Rachel Tunstall
Promote your products across Google with Shopify's Google channel
Shopify’s Google channel makes it easier than ever for retailers to get their first sales from Shopping Ads. The Google channel app for Shopify can help you get a feed up and running fast, and get your products in front of customers. Create a Smart Shopping campaign with ease and list your products for free using Shopify’s Google channel.
Install Google Channel